Thursday, January 31, 2013

Sea Kettle Nursery School

There are habits that I want to foster early in Levi's life; habits like reading, being creative, making music and being active. It must just be the teacher in me, as I recently set up a schedule of sorts to keep us more accountable and give us a little more structure to our week. This way, no matter what, I have a loose plan to do these fun and educational activities at least once a week. I gave each day a "theme" and we can decide to go as simple or as complex as we want depending on what else is on the docket that day. And of course we call it "Sea Kettle Nursery School", just for the sake of utter fun and cuteness.

Monday- Sensory Play: rice, rocks, water, play-dough

Tuesday- Music: Listen to it, play it

Wednesday- Art: Walk to the Peabody Essex Museum for 
story/craft, work on an art project

Thursday- Reading: Go to the library, read books

Friday- Active Play and Social Skills:  Church playgroup 
(every other week); Go to the park, take a walk, play ball

Weekend: Family and Field Trips: the zoo, a museum, a farm, Beverly airport, ride the train.

Needless to say, we are enjoying our little "Sea Kettle Nursery School" immensely. It adds a nice rhythm to our week and you can't beat the 1:1or2 student/teacher ratio. :)

(is this a precursor to homeschooling you may ask? you never know..you just never know) 

Wednesday, January 30, 2013

Art Room Diaries: Of Late


a bit of what we've been working on - 

1. Creature Tessellations inspired by M.C. Escher
2. Post-Impressionist Still Lifes - painted from observation, inspired by Paul Cezanne
3. "Garden of Eden" Glue and Foil Bas-Reliefs - inspired by Renaissance sculptor, Lorenzo Ghiberti
4.  Optical Illusions - Inspired by the Op-Art Movement
5. Clay Pueblo Storytellers - Inspired by the art of Helen Cordero
6. Colored Pencil Still-life - Drawn from observation
7. Pencil Vs. Camera Drawings - Inspired by contemporary artists, Ben Heine
8. Mono-chromatic landscape - learning how to create tints and shades
9. Pop Art Shoe Prints - inspired by Andy Warhol
10. Futuristic Floating Art Museums - in 3 and 4 point perspective
11. High School Art Independent Projects - see more here

just itchin' for more? Check out my students' online art gallery:

Tuesday, January 29, 2013

sweetness

What good is summer without the cold of winter to give it its sweetness?
-John Steinbeck
Thankful this week,

- sweetness, even in winter; but also the promise of spring
- dessert dates with friends
- beautiful high school paintings in process
- Winter Evening at New Hope; watching my oh-so-intellegent and oh-so-hilarious students preform 
- a new and surprise song, written while I slept, inspired by MLK Jr. 
- my creative arts ministry team; people to laugh with, to talk shop with, to dream with
- time to paint and sketch
- seeing good old friends and a St. Pattys Day feast in the works
- Lianna and her whoopie pies
- this beautiful post written by my sister
- flannel sheets, blankets, tea, soup, warm family and warm kitty
- Levi's squishy-faced smile, his songs, our conversations
- a bittersweet "Take-Off" party for the dearest of friends, especially the after-party, their heart for Fiji
- these years of almost-daily blogging, this family journal, this record of life, art, joys and sorrows, thanks...and for THIS, my 1000th post!
- and my favorite winter sweetnesses..


Monday, January 28, 2013

busy-ness and a bit of blog business

(This weekend was very full (very GOOD full, but full nonetheless) and it left barely enough time to finish my lesson planning let alone writing out my usual Monday list of thanks. Tomorrow perhaps. For now, a bit of blog business.)


I've decided to turn off the comments on my posts...partly because I've been getting oodles of spam and partly because I have a hard time keeping up with responding to comments in a timely manner and when I do, I never know if you've read my response.  In general, it's far easier for me to reply to emails, so for now, feel free to email me if you have a question/comment or whatever

I hope this doesn't cramp your style...I really do love hearing from you. It always means a lot when someone takes the time to step out of the dark anonymous caverns of the interwebs to say "hello". :)

Thursday, January 24, 2013

sweaters for Elsie and Natalie


Two special little ladies were born this winter, so two special little handknits were most definitely in order. 

After becoming mildly obsessed with searching for the perfect baby girl sweater, I came across this crochet "recipe". It was perfect; simple yet tasteful, feminine yet not too girly-girl. I crocheted the pattern "as is" for Elsie since she lives up here in frigid New England, but I left Natalie's sleeveless as she lives in North Carolina.  I figured she could wear a long sleeved onesie under hers on the colder days and then get some more wear out of it when it warms up. Design-wise, I love it both ways. These tiny sweaters were such a pleasure to crochet and this has definitely become my new go-to pattern for baby girls.  

(and can I just say, I think these two just have the LOVELIEST of names.)

Wednesday, January 23, 2013

flowered ear warmers for the sisters (a recipe)

While Kimmie was home for Christmas, she asked me to make her an ear warmer. I found a couple patterns to combine, pulled out some leftover yarn from my stash and worked one up while we nestled in for a good movie. Of course, I just kept going and pretty soon the rest of us sisters had one too..'cuz you know we McKenna girls just love to match. :)

(To make: crochet this band, then crochet and add the flower from this pattern.)
Speaking of Kimmie, she just landed in Thailand for yet another semester abroad. If you're interested in keeping up with her adventures, check out the sequel to Rwandering KimmieMeandering in Mekong.

Tuesday, January 22, 2013

the last 17 months, according to photobooth

I was recently looking through the photobooth folder on my mac. It was rather striking to see the quick progression of time and growth through our every-so-often computer camera self-portraits. 


..excuse me while I indulge in a little trip down memory lane. :)


Monday, January 21, 2013

speak forth His praise


Let my hands perform His bidding,
Let my feet run in His ways; 
Let my eyes see Jesus only, 
Let my lips speak forth His praise.

- from the hymn, "All for Jesus"

Speaking forth His praise, for...

- many wonderful still-life paintings in progress
- a deep and honest small group discussion
- Brian napping next to me
- music lady day at the PEM, and coffee with Ariel and Elsie
- mild walks in winter
- rocks, flowers, candles
- logistical nightmares, figured out
- new baby Natalie
- strawberry shortcake with some new friends
- Brian and Levi on a hike and me..sleeping until noon. 
- exciting developments in a new venture and helpful friends
- Levi and his love for his "older" friends
- a husband who stays up too late to rub the knots from my neck and wakes up too early to do it again
- a last minute date night thanks to Aunt Katie and Uncle Matt; Uncle Matt's way-awesome fort
- this shorter and more laid-back work week
- Levi, nestling
- blustery days
- a saturday afternoon feast of local breads and steaks with Big C
- a football get together, less for the football and more for the  food and fellowship (and seeing Aunt Debbie and Uncle Roger)
- a fun trip with the grandparents to see the "Hats" exhibit at the Peabody Essex Museum ...

Thursday, January 17, 2013

Christmas Round Up 2012: Reindeer Finger Print Ornaments


Levi also got in on all of this handmade gift action by making these cute little reindeer ornaments for his family members. Well, he HELPED at least. :)

What you need: 

1" wooden circles 
Drill and small drill bit
Stamp pad
Mod podge and a brush
Sharpie or other permanent pen
Ribbon

What to do:

1. Drill a small hole in each of the wooden circles.
2. Using a stamp pad, print the child's thumb horizontally for the reindeer's body and pointer-finger kitty-corner for the head.
3. Paint the entire ornament (back and front) with mod podge or other protective sealant.
4. When the mod podge is dry, add details with extra fine point sharpie (eyes, nose, mouth, legs, tail, antlers). On the opposite side, I added "Christmas 2012 - Love, Levi". Note: if you use the sharpie before sealing the wood, the lines tend to bleed and look messy..take it from me. :)
5. Thread the ribbon through the hole and tie a bow.

You don't have to make reindeer, you could use a child's fingerprints to make all sorts of creatures or animals. Artist and illustrator, Ed Emberley, is a great inspiration if your interested in exploring other options.

***


Well, that about concludes the Christmas Project Round Up 2012.  I have one more special project to share, but for reasons that will become clear later on, it needs to wait. :) For now, I hope you've enjoyed seeing what I was up to during the month of December and are inspired to use some of these ideas for yourself!  

Wednesday, January 16, 2013

Christmas Round Up 2012: Spa Day Baskets

Ahh, these spa day baskets were very fun to put together. After reading quite a few recipes for skin scrubs and bath salts, I ordered a couple of bottles of essential oils and went to work creating my own variations(for better or for worse, I've never been good at sticking to recipes). I chose lavender and eucalyptus mint, as they smell good AND promote restful sleep, uplifting moods and stress reduction..perfect for these busy, hardworking women of mine.
* * *

Aromatherapy Spritz:
Fill bottle almost full with distilled water, add about a teaspoon of vodka and at least 10 drops of essential oil. Give it a shake.

Lavender Eucalyptus Mint Bath Salts:
Mix a cup of epsom salt, a teaspoon of baking soda, a few drops of essential oil.

Lavender Sugar Scrub:
1 cup sugar, 1/3 cup olive oil, a few drops of essential oil. (this is a good place to start, but I ended up adding more sugar little by little until I had the consistency I wanted)

Also tucked in the basket: a loofah, a scented votive and a glass candle holder.


Tuesday, January 15, 2013

Christmas Round Up 2012: Manly Meat Rubs


I always find it harder to figure out the right handmade gifts for men (well, men other than Brian - because he's weird awesome). You can only knit so many hats and scarfs, you know? 

This year, I stumbled upon some recipes for homemade meat rubs on kojo-designs.com. Paired with a gift certificate to a local butcher, I thought they would make the perfect gift for all of the male meat-lovers in the family. I haven't heard yet if they taste any good, but they certainly smell amazing!

(You can get the full tutorial, recipes and even downloadable labels here.

Monday, January 14, 2013

sea kettle gardens in winter: in word and image

The dead and new, both now
here in Winter, crisp articulations
where plants were living: styles. 
-B. James


Friday, January 11, 2013

papa's home

..yup, still the best part of our day.
{this moment}
Joining with SouleMama


Thursday, January 10, 2013

Christmas Project Round-Up: Granny-Square Mug Cozy


Brian's last handmade gift was a mug cozy made to personalize a two-handled mug I found at a local pottery shop.  

I know it's odd, but for the longest time we've been in the habit of sharing a cup (just seems easier? less dishes?). I'm right handed and he's left handed; hence, a cup with a handle for each of us. Brian immediately dubbed it "The Unity Chalice" and you can bet we've been drinking from it ever since.(As a side note, I was rather surprised at how hard it is to find a two-handled cup that isn't for babies or people with arthritis! I got lucky stumbling on this beauty!). 

The mug cozy is almost identical to one I made last January, just altered to fit the size of the new mug chalice (see tutorial here). It's a very quick crochet and a charming handmade gift for any lover of hot drinks.

Wednesday, January 9, 2013

Christmas Round Up 2012: Painted Wooden Clock


Longtime readers might remember this poem Brian wrote inspired by my photographs (seen here). 

that we would scratch the sky with wire, that you would still alight
and dignify our lines with light-boned watchers
in the early evening light

that you would settle there, just seven feet above
our stubborn heads, to tilt them from the paths of aging
and toward the weightless wanderings of birds
before the knell of night

-B. James


As a token of the fact that we inspire each other's artistic ventures quite frequently, I decided to paint Brian a clock inspired by his poem which was inspired by my photograph. (and now perhaps he will write a song inspired by my clock? haha) You may also notice that I painted an extra baby bird not seen in the photographs. :)

You can buy wooden plaques with holes in the center and a clock kit at your local art store.  I used acrylic paints to create my design, then sealed it with clear varnish. The clock kit has directions on how to install it. Very quick and easy.

(just like yesterday's project this is another totally blank slate; you could mod podge pretty paper onto it or even fabric, use a favorite stencil, paint it white and use a black paint pen to write a special verse or poem across it...whatever!)

Tuesday, January 8, 2013

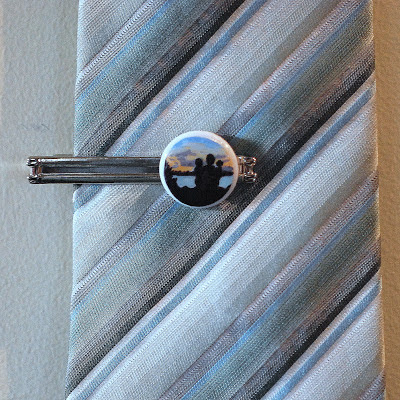
Christmas Round Up 2012: Button Tie Clip


This tie clip idea came after seeing a rather boring silver tie clip at Target in the dollar bins.  I figured at that price, I could do something with it.  Brian wears a tie everyday to work, but has never owned a tie clip. Perhaps he needed to start?


I found a white button in my sewing stash that looked relatively well-proportioned and was smooth on one side.  Then, I cut a piece of thick bristol paper to match the size of the button.  On this tiiiiny piece of paper, I painted a silhouette based on the photo we took on our sunset date last February.  In the photograph, Levi's was not so prominent, so I used a little artistic license here so it was obviously a painting of all of us. 

After completing the painting, I used diamond glaze to attach the paper to the smooth side of the button.  I also used the glaze to paint a coat over the top of the painting.  This stuff is great as it is an adhesive and a varnish in one.  It is similar to mod podge, but feels thicker and more durable.  After the glaze dried, I attached the button to the tie clip using my favorite strong craft glue, E6000.  

You don't need to be a painter to personalize a tie clip like this.  You could use a photo, decorative paper, comics, fabric, almost anything!

more man-gifts coming right up!

Monday, January 7, 2013

let me be singing

The sun comes up, 
it's a new day dawning
It's time to sing Your song again
Whatever may pass
and whatever lies before me
Let me be singing
When the evening comes
Bless the Lord, Oh my soul!

Thankful,

- getting back into the swing of things at work, excitement for the projects ahead
- New Year's Eve festivities; games and food with friends, a hysterically awful film viewing with my parents, Lowell's New Year's prayer to start the year off right
- time with Kimmie and Kevin before their new semester
- Levi, showered with gifts from the James family New Year's Day party (that I had to miss!)
- surviving the James Family Plague 2013
- aunts, uncles and grandparents who came to save the day with ginger ale and babysitting
- skyping into Katie and Matt's birthday party
- when Brian's jokes were back
- a new church location (a beautiful, clean, historic and light-filled space)
- downton impressions with Brian
- a pre-stomach bug first sledding trip, on the same hills I grew up playing and sledding on..

Saturday, January 5, 2013

breakfast at the airport


In the next town over there is a small airport. Like, very small...no terminals, ticket counters, any of the stuff that makes an airport seem like an airport. The things it DOES boast is a little cafe and small private planes taking off every so often. 
We've been wanting to take Levi for a while, so winter break seemed like the perfect opportunity. We met up with all of Levi's grandparents at the Airport Cafe one morning and had breakfast to the sight and sound of planes taking off and landing. A very exciting excursion for a plane-loving little guy (that boy can hear and see planes in the air before anyone else I know!). 

Friday, January 4, 2013

Christmas Round Up 2012: The Family Color Number Book

(* thanks for the comments, emails and texts yesterday. We had a nice long cuddlicious day and Levi seems much better after completely purging his system..ahem.  Unfortunately, the bug was shared, so I'm rather out of commission today and literally counting the minutes until Brian gets home. This too shall pass, right? Stay healthy, friends!)
Levi's third and final gift was a "Family, Color, Number Book". I thought it would be a great way for him to practice saying names and learning colors and numbers. He loves pointing out people he knows in pictures, so I figured this might be a fun and motivating way to learn these other concepts.

During Thanksgiving, I took a photo of each immediate family member (or group) holding a certain number of a certain colored thing. I had them pose in front of a white sheet for unity and simplicity. After cropping/editing the photos, I used Blurb to put the book together and add text. Despite a couple of errors (green books that look blue, an extra purple painting), the book came out beautifully, I think. You can view it in its entirety, here 


(somehow I forgot to take a picture of page 8 and 10 - whoops)

And to finish it off.. 

Thursday, January 3, 2013

sick day

I had every intention of finishing up a new project post for today, but Levi's first stomach bug changed those plans real fast.  I'll spare you the gory details, but let's just say last night consisted of 8 full clothing changes between the three of us, 3 loads of laundry and a family camp-out in the living room. 
This morning things are looking up, but we may very well just stay our PJs, nap and cuddle on the couch(oh yeah, and maybe put a dent into all of that laundry). I hate that my baby boy is sick, but I can't say I mind that the only place he wants to be is in his Mama's arms.

(and I heard its like 6 degrees outside, so I staying inside sounds just fine to me)

Wednesday, January 2, 2013

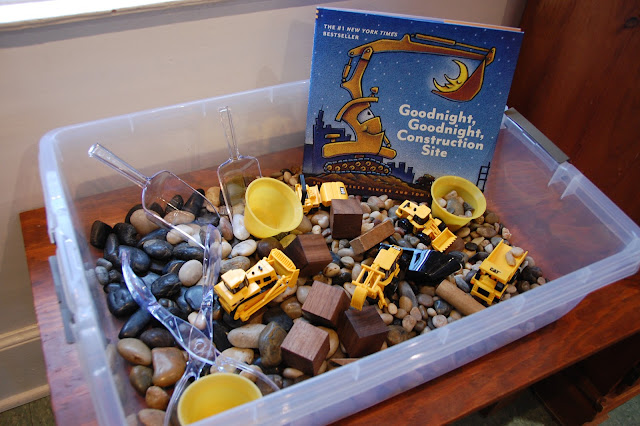
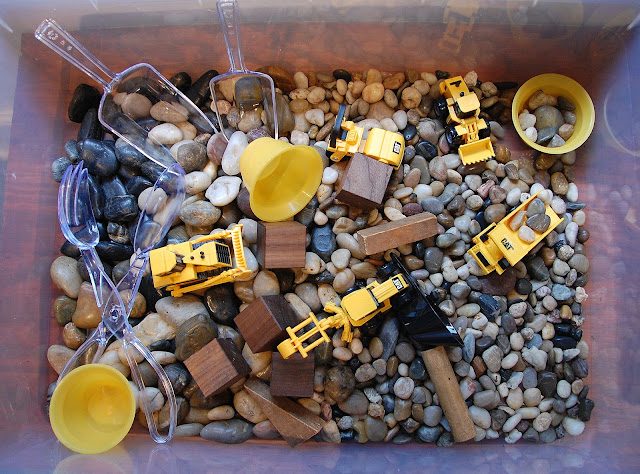
Christmas Round Up 2012: Construction Sensory Bin

Don't tell the others, but this might be my favorite gift I put together this year. :)

I've started a bit of a tradition of giving Levi a book with homemade toys to go with them.  I got the idea pre-Levi when I made a mitten full of animals to go with the book "The Mitten".  I love the concept of having a story and tangible ways to make that story come to life through imaginative play.  Last year, I made a monkey and drum to go along with one of his favorite books, "Hand, Hand, Fingers, Thumb".  

This year, I had the toy concept before the book. I really wanted to start making Levi some sensory bins (what is a sensory bin, you ask? read this).  My Grandma was a pre-school teacher and she always had bins of rice for us to play in with various types of scoops and funnels.  It was such a fun and creative activity and I knew Levi would love something like this. I'm working on a rice bin, but for Christmas I gave Levi a bin of rocks (a little less messy than rice to start out!). 

I filled the storage bin an inch or two full of polished rocks (from the dollar store) and then added different types of shovels, cups, blocks and anything else I thought he could dig and play with. Most of these things I just gathered from stuff in the kitchen or his toys that we already had. I topped it off with a little set of construction vehicles from Target for about $5. I found a great book to go along with it called "Goodnight, Goodnight, Construction Site." I highly recommend it for any little construction lovers out there.
Levi LOVES it. It's definitely his activity of choice right now and will spend a good chunk of playtime digging through his very own "contruction site". And unlike many of his toys, Brian and I actually kind of like playing with it too. Win, win!

*obviously if you make your own make sure to supervise your child, especially if they like to put things in their mouths! Luckily, Levi is getting past this stage and hasn't tried to eat any rocks. :)

Tuesday, January 1, 2013

Christmas Round Up 2012: I Spy

First of all, Happy New Year! 

Second of all...it's that time. Oh yes, that's right - Christmas Project Round Up 2012! Since I haven't quite given out all of my gifts (a couple of family members were traveling), we'll start with some things I made for the boy.

This "I Spy" game is very simple to make and very fun to play with.  The child looks at the photograph of tiny objects and shakes the canister to find each object.  I made one for Levi and another for his friend, Evan.

Levi is a little young for that much sustained concentration, but I'm sure he'll grow into it in no time. For now, he's a huge fan of shaking the canister and using it as a drum. :)
Materials:

- a clear plastic bottle or bin (I found mine for a couple of dollars in the wrapping/container section of my local art store)
- white rice
- a strong glue; I use E6000
- a variety of objects
- laminated photo of objects (or just a list of objects, if your child can read)

1. Collect a variety of small objects. I used foam shapes, beads, pennies,  fake flowers, buttons in the shapes of animals, cars, planes etc. Hint: try to think of things that the gift-reciever likes. You could even have a theme..Christmas, winter, trucks, the color green.. 

2. Once you have all of your objects collected, lay them out and take a photo.  I placed them on a white piece of paper for a simple background.  

3. Put the objects in the bin along with white rice.  I filled mine until there was about an inch of space on the top, so the rice could move around easily when it was shaken.

4. Glue the lid to the bin with plenty of E6000 or other strong glue. Let dry.

5. Get the photo printed and laminate it.  I punched a hole and tied it to the handle of my bin with ribbon. 

There you have it.  A fun, interactive, handmade toy; easy and on the cheap. BAM.